In this article I’ll describe how to adapt and rename an existing filter in the G’MIC plugin for Gimp, and create an own entry for it in the filter list.
This article is based on a document written by David Tschumperlé – the main developer of G’MIC – but adapted to photographic use. Here we’ll look at the basics to make your own filter; in some follow-up articles we’ll go a step or two further.
In an earlier article I explained how you could make a preset of an existing G’MIC filter and give it a new name, all on the command line. We can do exactly the same thing in the G’MIC plugin for Gimp.
If you are familiar with the G’MIC plugin, you may say “But hey, if I add a current G’MIC filter with the current settings to the Faves section, I’ve got the same result, isn’t it? And I can rename it as well.” That’s right indeed, but what you can’t do that way is combining two or more G’MIC filters or leave some sliders out that you are not interested in. And that is what I am going to show in part II of this series: how to group a couple of filters that you are interested in, together in one ‘new’ filter with the default settings that you like. That means that instead clicking around in different G’MIC sections like Details or Repair to find the right filters for sharpening and denoising for example, we bring them together under a new name.
But before we can do that, we must know how this G’MIC thing works, interface wise. As you will see shortly, this is not that complicated once you get the hang of it.
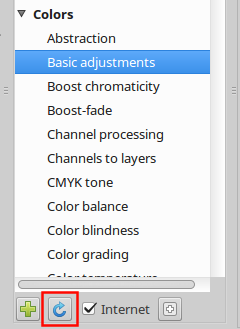
For this example I’ll use an existing filter called Basic adjustments. It is located in the Colors section of the G’MIC filters.

Copy, rename, adjust
I am going to copy this filter, rename it (so that it appears elsewhere in the filter list) and leave out the gamma and hue sliders. As described in the previous mentioned article we must first find the technical name of this filter and its parameters. For that we open a terminal window and we type the following to start Gimp:
$ gimp
(don’t type the dollar sign, just gimp and hit <Enter>).
Then we open a photo and run the G’MIC plugin via the Gimp menu Filters, then G’MIC… In the window that pops up, we say on the left side…
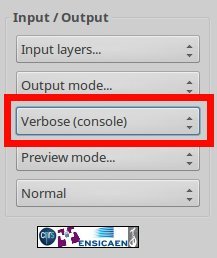
… that the output messages must be sent to the console (= the terminal window we used to start Gimp). Navigate to the Colors section, then click on Basic adjustments. Switch to the terminal and you’ll see this last line:

As explained in the earlier article, the filter name we are looking for is ‘gimp_adjust_colors‘ (without the _preview part) and the six zero’s at the right side correspond to the five slider values plus the preview type. Change any slider in the filter window and you’ll see corresponding changes in the terminal output.
Creating the filter
To add a filter to G’MIC’s filter list, we must make and edit a hidden file called .gmic. On Linux and OS X this file must be located in the home directory. On Windows this file is called user.gmic and must be put in the AppData folder.
Nota bene. If that file exists already on your system (for example because you read and tried the earlier articles about gmic processing on the commandline), just place the following line anywhere in that file.
#@gimp My.Basics : my_basic_adjusts
This means: add a new filter called My.Basics to the filter list and if you click on that, execute the function my_basic_adjusts (that does not exist yet).
Save the file, go to (or re-open) the G’MIC plugin window and click the Reload button located below the filter list.
And hey, there she is!

Now we instruct the filter what it has to do (what function to execute) when it is clicked. In the .gmic file, we add the following two lines below the existing one:
#@gimp My.Basics : my_basic_adjusts
my_basic_adjusts:
-gimp_adjust_colors 20,0,0,0,0,0
This is basically the command line version: when executed (that is: when the users clicks on Apply or OK at the bottom of the G’MIC window), the brightness is set to +20.
But of course we don’t want to apply a fixed value, we want to play with that brightness slider and choose a value ourselves. That’s easy again! Add the following line to the .gmic file, below the first one:
#@gimp : Brightness = int (0,-100,100)
That’s all to create a slider! The word Brightness is the label of the slider (you can give it any name you want). On the right side it says int (0,-100,100). Int stands for integer, that means the filter accepts (or proposes) positive and negative whole numbers like -50, 0 or 2500. The default brightness value that is proposed to the user is that first 0; the range is from -100 to +100. If int is replaced by float, the user can select the fractional component as well, like -50.52, 0.10 or 2500.71. If the user clicks the Reset button at the bottom of the filter, the sliders jump back to these defaults settings (so not necessarily 0).
The slider value you choose here is stored in a variable called $1. To pass this variable to the function, change the command as follows:
-gimp_adjust_colors $1,0,0,0,0,0
The code for our filter is now:
#@gimp My.Basics : my_basic_adjusts
#@gimp : Brightness = int (0,-100,100)
my_basic_adjusts:
-gimp_adjust_colors $1,0,0,0,0,0
Save the .gmic file and reload the filter list in the G’MIC window. That gives this.

Change that brightness slider to +50 and click on OK. The filter is working now and after a couple of seconds the result will be displayed on your screen. But hey, that’s Ugly! Yes of course it is, that brightness value was way too high! What we need of course is a preview of what the filter does. We’ll do that in Part II of this series…
Banner at the top of the page: G’MIC filter Local orientation, in section Contours.

pm|jul16
