
Introduction
The open source package G’MIC is an ever-growing collection of filters that can be used from the command line, as a plugin in GIMP or direct online. Some of these filters are interesting for photographic purposes like sharpening or denoising for example, while others may be more of interest to illustrators and the like. In this section of my little photo palace I’ll show you (over time) what these photographic filters are capable of, using the plugin version.
G’MIC stands for GREYC’s Magic for Image Computing and the main developer behind this is David Tschumperlé, researcher at the GREYC institute (Groupe de Recherche en Informatique, Image, Automatique et Instrumentation de Caen) in the northern French city of Caen. Many filters are developed for scientific applications, but there’s a group of people involved with this software that adds more and more photographic functionality. Once installed you’ll see the following main window.

As you see, the different filters (442 with this version) are grouped into several sections. A quick overview of what they do can be found on the GIMP page of the G’MIC project, see screenshots further below on that page. Click on those screenshots to see which settings were used.
Well, that’s a lot of fun, isn’t it? This is really perfect software for a rainy Sunday afternoon. Because many filters have lots of sliders and because you can combine several filters, the possibilities are literally endless!
You can also use the online version of G’MIC to have a further look and touch the sliders. You can upload your own photo as well, provided its size is less than 2MB. When you’re done, you can download it to your pc. Not all the filters are available here.
Explore downsized!
If you want to explore the G’MIC filters on your pc, it is strongly advised to use a downsized photo, as some filters really need a cluster of supercomputers to do their work! You can estimate the speed of a filter by the time it takes to build the preview. If that’s practically instant, you’re okay, but if it takes five seconds or more, the processing will be slow. The slowness also comes from the fact that not all filters are capable of multi-core processing yet. But even when they are, it can take up to five minutes or more to process a 16mp file. To reduce the size and thus the memory consumption of the current loaded photo with a factor of 4, click in the GIMP menu on Image, then Scale Image, change ‘px’ to ‘%’ and choose for example 50 for both Width and Height. No need to save something.

As said, here I will concentrate on the photographic filters and those can be found in the sections Black & White, Colors, Details (sharpness filters), Repair (denoise tools), Film Emulation and Frames, among others. The Testing section at the bottom of the list is a place where several contributors put their newest filters to test. If all works well they might be ‘prolongated’ to the sections above or they just stay ‘downstairs’. This explains also why some filters in Testing are practical the same as in the official section.
You can also write your own filters and put them somewhere in the filter list of the plugin. I’m not going to cover this. If interested, have a look in the About section and click Links, then Tutorial. [Update, some months later. What I said there turned out to be untrue after a while! Now you can just go to the menu on the top of this page, click on G’MIC, then ‘Create your own G’MIC plugin for GIMP, part I’ and there you go! /update] ].
If you like a filter, you can ‘Fav’ it by clicking on the green plus sign under the filter list.

A new section called Faves is created and your filter will be there.

You can also store several copies of the same filter, with different settings. Double click on the filter name in the Faves section to rename it.
In the section About there is an entry called Search filters. Click on that and you can – yes! – search for filters, try sharpen or noise for example. By clicking on the Fav button, you can place that Search entry in the Faves section, so that it is always on top when you start G’MIC.
On the right side of this green + sign there is another + sign, in grey. If you click this one all the filter entries will open and you can use the arrow keys to navigate the filters and to see what they do.
Last thing. Left under in the Input/Output frame there’s a button that shows ‘Normal’. This determines how big the preview window will be.
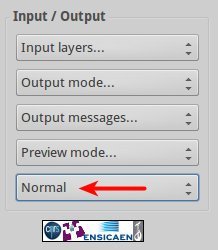
It is often a good idea to choose ‘Large’ here, as it is to maximize the whole G’MIC window. Some filters contain many many sliders, for example the filter Color grading, to be found under Colors. This filter alone is nearly a complete image processing application!
Download
On G’MIC’s main site you can download the latest versions of the GIMP plugin for Windows, Mac OSX and Linux. Or use your package manager. In that case, install gimp-gmic, this is the plugin for GIMP. If you install gmic, you’ll get the command line version and you can set up your own image processing pipelines, very much like ImageMagick or GraphicsMagick. The big advantage of the GIMP plugin is that the effect of many filters can be previewed. Keep in mind though that the preview is not always the same as the result. This is because nothing is perfect in this world.
___
pm|nov15
