
In this third article about making your own G’MIC filters for GIMP, I’ll show how to combine several noise reduction filters into one ‘new’ filter, so that you can quickly compare the results. Because it’s easy to do, I’ll do the same with some sharpen filters as well.
Nota. When I first published this article, I combined several sharpen filters into one new filter. But it turned out that setting initial filter sliders to 0 was not the same as switching a filter completely off. With the result that a filter that took normally 5 seconds to process could take 30 or 60 seconds with other filters added (and with sliders set at 0). Apparently they were still doing things so they ruined my original article! After testing a combination of several noise reduction filters, I decided to rewrite this story. I still provide the code for some sharpness filters at the end though.
In the first two articles we have seen how to copy and adapt an existing G’MIC filter and how to add a split preview. In this article I’ll show you how to combine several noise reduction filters into one new filter. By keeping only the basic slider for Strength or Amount or equivalent, it’s easier to compare those filters. I did not use all the available filters, because some are too slow to use this way (good candidates for batch processing) or some were not adapted for photographic uses (or I might have missed the point of the filter). I will do the same with some sharpen filters.
But first we create a group or a section in which these filters are going to appear, to avoid that they are scattered all over the place. The G’MIC command to create a group called Photomat is:
#@gimp Photomat
The G’MIC command to end a group is:
#@gimp _
From now on, all the functions you write between these two lines are stored in the section Photomat in G’MICS filter list.

ManyBlur
As explained in Part I and Part II of this series, we need to find the names of the filters we’re interested in plus the (for our filter) relevant parameters. So start Gimp from a terminal, open a photo, run the G’MIC plugin and set Output messages to Verbose (console).
The first filter that interests me is called Iain’s fast denoise, located in the Repair section (like all the following denoise filters).
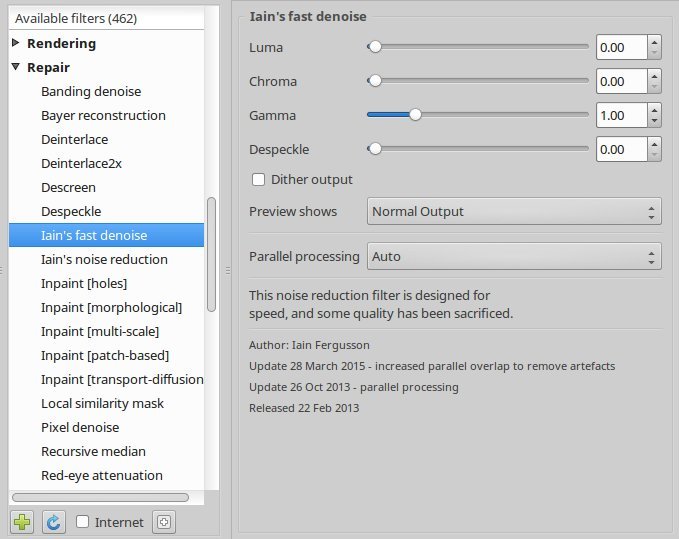
After moving several sliders and trying different options, I conclude that the first slider called Luma is the one I want. I leave the other sliders and options at their default settings. The range of that Luma slider is a bit too high to my taste, as a value of 3 (max) damages my photo seriously. So I decide to limit the range to an arbitrary value of 2.25.
A look at the terminal window shows that this filter is called iain_fast_denoise and the slider we want to use is the first one, Luma.
I name my new filter ManyBlur and create the functions manyblur and manyblur_preview, with the preview set to 100% (that is the 0 below):
#@gimp ManyBlur : manyblur, manyblur_preview(0)
Then we create a note to inform the user what this filter is for:
#@gimp : note = note ("A 'just-one-slider' preview of some noise reduction filters from GMIC's Repair section")
Then we add a separator:
#@gimp : separator = separator()
First slider
First we give this noise reduction filter a name:
#@gimp : note = note ("Iain's fast denoise")
We want a maximum value (2.25) that is more limited than the original range and we set the default value to 0.00 (that first 0.00 below):
#@gimp : Luma = float (0.00, 0.00, 2.25)
We end with a separator again:
#@gimp : separator = separator()
That gives this:

We want a split preview of course so we add the Preview prose:
#@gimp : Preview = choice ("Full","Forward horizontal","Forward vertical","Backward horizontal", "Backward vertical","Duplicate horizontal","Duplicate vertical")
Then we say what the filter has to do:
manyblur:
-iain_fast_denoise_p $1,0,1,0,0,0,1
The $1 is the variable that holds the value of the Luma slider.
The complete code for out filter is now:
#@gimp ManyBlur : manyblur, manyblur_preview(0)

#@gimp : note = note ("A 'just-one-slider' preview of some noise reduction filters from GMIC's Repair section")
#@gimp : separator = separator()

#@gimp : note = note ("Iain's fast denoise")
#@gimp : Luma = float (0.00, 0.00, 2.25)
#@gimp : separator = separator()

#@gimp : Preview = choice ("Full","Forward horizontal","Forward vertical","Backward horizontal", "Backward vertical","Duplicate horizontal","Duplicate vertical")

manyblur:
-iain_fast_denoise_p $1,0,1,0,0,0,1

manyblur_preview :
-gimp_split_preview "-manyblur $*",$-1
Next
Now we add the following filter, Recursive median, following the same procedure: a note with the filter name, the slider we are interested in, its parameters and again another separator.
Then we paste the name of the new function in our manyblur function, just under the -iain_fast_denoise line. Remember that the value of this second slider is stored in the variable $2.
manysharp:
-gimp_deblur $1,10,20,0.1,1,11,0,24,0
-gimp_unsharp_goldmeinel $2,5,1,1,1,11,0,24,0
I just add another two filters and in the end we have a ‘new’ filter called ManyBlur that looks like so:

If you like, copy the code and paste it in your .gmic file. Save that file, reload the G’MIC plugin and you’ll find it in the section Photomat in the filter list.
We’ll make a new section called Photomat and put the ManyBlur code in it. Copy the code starting with the next line.
#@gimp Photomat

###### manyblur ################
#@gimp ManyBlur : manyblur, manyblur_preview(0)

#@gimp : note = note ("A 'just-one-slider' preview of some noise reduction filters from GMIC's Repair section")
#@gimp : separator = separator()

#@gimp : note = note ("Iain's fast denoise" )
#@gimp : Luma = float (0.00, 0.00, 1.00)
#@gimp : separator = separator()

#@gimp : note = note ("Recursive median")
#@gimp : Median radius = float (0.00, 0.00, 4.00)
#@gimp : separator = separator()

#@gimp : note = note ("Smooth [anisotropic]")
#@gimp : Amplitude = int (0, 0, 50)
#@gimp : separator = separator()

#@gimp : note = note ("Smooth [guided]")
#@gimp : Smoothness = int (0, 0, 300)
#@gimp : separator = separator()

#@gimp : Preview = choice ("Full","Forward horizontal","Forward vertical","Backward horizontal", "Backward vertical","Duplicate horizontal","Duplicate vertical")

manyblur:
-iain_fast_denoise_p $1,0,1,0,0,0,1
-iain_recursive_median_p $2,1,0,0,1
-gimp_anisotropic_smoothing $3,0.7,0.3,0.6,1.1,0.8,30,2,0,1,1,0,0
-gimp_blur_guided 5,$4,1,0,0,24,0

manyblur_preview :
-gimp_split_preview "-manyblur $*",$-1

###### /manyblur ##############

#@gimp _
(Copy the filter code until – and including – the above line).
I do the same trick with some sharpen filters, that looks this way.

Feel free to copy the code below. Paste it under the manyblur code and take care that the #@gimp _ line is the last one to keep them grouped.
###### manysharp #############

#@gimp ManySharp : manysharp, manysharp_preview(0)

#@gimp : note = note ("A 'just-one-slider' preview of some sharpen filters from GMIC's Details section")
#@gimp : separator = separator()

#@gimp : note = note ("Sharpen [octave sharpening]")
#@gimp : Amount = float (0.00, 0.00, 10.00)
#@gimp : separator = separator()

#@gimp : note = note ("Sharpen [inverse diffusion]")
#@gimp : Amplitude = int (0, 0, 200)
#@gimp : separator = separator()

#@gimp : note = note ("Sharpen [richardson-lucy]")
#@gimp : Sigma = float (0.00, 0.00, 3.50)
#@gimp : separator = separator()

#@gimp : Preview = choice ("Full","Forward horizontal","Forward vertical","Backward horizontal", "Backward vertical","Duplicate horizontal","Duplicate vertical")

manysharp :
-gimp_unsharp_octave 6,5,$1,0,0,0,24,0
-gimp_sharpen_inversediff $2,1,11,0,24,0
-gimp_unsharp_richardsonlucy $3,4,1,1,0

manysharp_preview :
-gimp_split_preview "-manysharp $*",$-1

###### /manysharp ##############
Banner on top of this page made with the G’MIC filter Continuous Droste in section Deformations. Colorized in Gimp.

pm|jul16
