Tag Archives: gmic batch processing gimp

Gmic batch processing – part II

Using two or more gmic functions to (batch) process photos, making those commands a bit more human readable and how to batch-make ten versions of the same photo with different filter settings is what this post is about.

In a previous post I explained how to process one or more photos using a gmic function via a terminal window. Adding more functions is as easy as adding them to the command we already had.

By doing so, the ‘pipeline’ (the order in which the image is processed) gets like so:

$ gmic input -function1 -function2 -function… output

Let’s say we want to add the sharpness filter called octave sharpener to our command. Like described in the previous article, we must start GIMP again from the command line like so

$ gimp

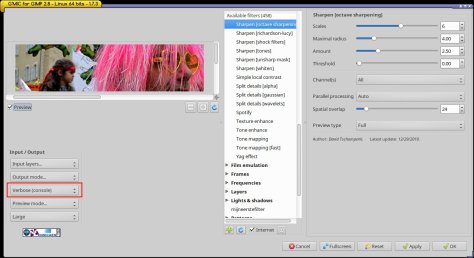
Next thing is to open a photo (any photo) and start the G’MIC plugin. On the left side we say again under Output messages that we want G’MIC to be verbose and that its output must be sent to the terminal (Verbose (console)).

IansNR.filter.partII

Now click in the Details section of G’MIC and choose Sharpen [octave sharpening] (a personal favorite of mine). I often set the first slider called Scales to 6 and the second one, Maximal radius, to 4 to reduce the power of the filter because we are working on jpg’s here and those are usually already more or less sharpened in-camera.

The terminal gives the following output:

[gmic_gimp]./preview/ -v -99 -gimp_unsharp_octave_preview 6,4,3,0,11,0,24,0

We copy again the right side, starting at -gimp… Delete that ‘_preview’ part.

The command to reduce noise from the first article on batch processing was:

$ gmic image.jpg -iain_iains_nr 0.613497,9.07975,2,609.756,390.244,0,1,0,0,0,1.35,0,0 -o iainNR.image.jpg

Nota: all the commands on this page are one-liners.

Just paste the octave output from above in the existing command after the noise reduction part. We get this:

$ gmic image.jpg -iain_iains_nr 0.613497,9.07975,2,609.756,390.244,0,1,0,0,0,1.35,0,0 -gimp_unsharp_octave 6,4,3,0,11,0,24,0 -o processed.image.jpg

To batch process a series of photos with both filters, say this:

$ for i in *.jpg; do echo $i; gmic $i -iain_iains_nr 0.613497,9.07975,2,609.756,390.244,0,1,0,0,0,1.35,0,0 -gimp_unsharp_octave 6,4,3,0,11,0,24,0 -o iainNR.$i; done

Of course we can format the above commands to make things better readable, but we take another approach. Read on.

Organize this please

As you see, the terminal command starts to get messy already and this with two gmic filters only! You can add many more but that will result in near-chaos. Happily gmic offers the possibility to create new and personalized functions. It is as easy as this.

Create a hidden text file called .gmic (on Linux or OS X) in your home directory or a non-hidden file called user.gmic on Windows in the AppData folder. In case you don’t know how to do that: open a text editor and save the empty file with the name .gmic, including that dot before the name.

To place the above noise reduction command (the iain part) into a new function called my_nr, add the following line to .gmic:

my_nr : -iain_iains_nr 0.613497,9.07975,2,609.756,390.244,0,1,0,0,0,1.35,0,0

Save the file. From now on you can use this filter by writing in a terminal

$ gmic input -my_nr output

(Don’t forget the hyphen before my_nr). That looks already better, no? We add the octave sharpener as well to the .gmic file and name it:

my_octave : -gimp_unsharp_octave 6,4,3,0,11,0,24,0

The command to apply both filters to a photo is:

$ gmic input -my_nr -my_octave output

To do this in batch, say:

$ for i in *.jpg; do echo $i; gmic $i -my_nr -my_octave -o gmic.processed.$i; done

Again, if your files end on JPG, write JPG as well in the above command. You can use many image formats. If your images are in tiff or png format, change the above line accordingly.

Different versions? No problem!

Another thing that might be of photographic interest is a command that takes one photo and produces several output files with different filter settings. This might come in handy to find optimal sharpness settings for a certain series of photos for example.

On a Linux pc, open a terminal and write something like:

$ for i in {1..10}; do echo $i; gmic image.jpg -gimp_unsharp_octave $i,4,3,0,11,0,24,0 -o octave.$i.jpg;done

This produces ten photos with the names octave.1.jpg, octave.2.jpg… octave.10.jpg, each with a different Scales parameter (the first slider in the octave sharpener in the G’MIC plugin and the first parameter after the command name), namely from 1 to 10. If you need specific values like 128, 256, 512… then write

$ for i in 128 256 512; do echo $i; gmic image.jpg -command -o filtername.$i.jpg

Oh, I forgot: the photo on top of this post is one from a series that is batch processed with gmic!

hor.bar
pm|jun16

Processing several photos at once

Some of the filters in G’MIC are quite slow, so processing a series of photos one by one can be time-consuming. Luckily it is easy to process them in batch using a terminal window, as shown below on a Linux system. This should work as well on OS X and Windows.

In order to batch process photos with G’MIC you must first install the package gmic. This is not the same software as the GIMP plugin that is called gimp-gmic. You can install gmic via your software manager or download a more recent version from here.

This version of G’MIC contains the default commands. To get all the available commands, use the built-in update command. Open a terminal and type

$ gmic -update

(without the dollar sign). From version 2.7.3 and onwards this will be done automatically when you run

$ gmic

without arguments, according to the main developer of G’MIC, David Tschumperlé.

Gmic offers about the same functionality as the plugin version for GIMP, but it is run from the command line. This opens possibilities that can not be achieved with the plugin version, like batch processing or integration with other command line programs.

To start the program, type the following in the terminal:

$ gmic

(again, without the dollar sign). A demo windows appears. Click on Tetris. Break your personal record. When done hit Esc to exit.

Gmic is a simple photo viewer as well. Type

$ gmic image.jpg

to open a photo called image.jpg that is located in the current directory. A window opens and the photo is shown.

[0] Tour Eiffel-m645-multi-expo.jpg (504x323x1x3)_110

Hit Esc again to close this window. The terminal gives some technical information about what happened. You can ignore that.

Iain’s noise reducer

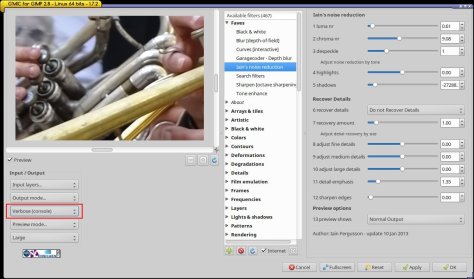
A noise filter I like and often use is written by Iain Fergusson, a regular contributor to G’MIC. A nice filter but a bit slow, so this is a good candidate for batch processing. The filter is simply called Iain’s noise reduction and in the G’MIC plugin for Gimp it can be found under the Repair entry. The default settings are a bit too much to my taste (but that depends also on the number of pixels of the photo of course and on the scene of the photo). So I adapted the sliders somewhat and added the filter to my favorites (that’s the Faves section on top of the filter list; click on the green plus sign below the filter list to ‘fave’ it with current settings).

In order to apply this filter via the command line to a photo, we must know the filter name plus its parameters. To find this out, start GIMP from the command line by simply typing

$ gimp

in a terminal.

Open a photo, start the G’MIC plugin via the menu Filters – G’MIC… and go to the section Repair, then click Iain’s noise reduction. Choose in the Input/Output field on the left for Output messages ‘Verbose (console)‘. From now on the terminal window shows exactly what happens when you click a button or change a value in a drop down menu in G’MIC.

IansNR.filter

When you change sliders or values, you’ll see every time a new line in the terminal with the word ‘preview‘ in it. When you click OK, you’ll see a new line with the word ‘apply‘, like in this screen shot.

nr.apply

This looks like crazy terminal prose (it is actually!) but it contains all the information we are looking for. The filter name is ‘iain_iains_nr‘ and the numbers on the right side correspond to the sliders settings and options in the dropdown menus. You can select the relevant (right) part of the terminal output with the mouse and copy it by clicking Ctrl+Shift+C. To paste this selection in a new command in the terminal, use Ctrl+Shift+V.

To apply this filter with these settings to a photo using the command line, we say for example this:

$ gmic -iain_iains_nr 0.613497,9.07975,2,609.756,390.244,0,1,0,0,0,1.35,0,0

The – after the gmic command means ‘use the filter with the following name’.

Of course we need to tell gmic which photo we want to denoise and to what file we want to write the output (for that we use the -o switch, output). Putting everything together we get this:

$ gmic image.jpg -iain_iains_nr 0.613497,9.07975,2,609.756,390.244,0,1,0,0,0,1.35,0,0 -o iainNR.image.jpg

Note: if your files end on JPG, write image.JPG in the command above. Of course most other image formats like tif or png can be used as well – but no raw files.

That line might look intimidating, but it simply says:

$ gmic input -function output

Batch

To apply this filter to more than one photo at once, say

for i in *.jpg; do echo $i; gmic $i -iain_iains_nr 0.613497,9.07975,2,609.756,390.244,0,1,0,0,0,1.35,0,0 -o iainNR.$i; done

A file called image1.jpg will be processed and written to a new file called iainNR.image1.jpg, et cetera.

In the next posts about gmic I’ll show you how to use several commands at once, how you can shorten the long command above to something like

$ gmic input my_NR output

and how you can keep the exif info in your photo intact (because, yes, gmic throws that away!). Also on the to-do list is to show how to create your own entry or entries in the G’MIC plugin for Gimp that combines one or more gmic filters and that basically allows you to build your own photo processor. So stay tuned!

Oh, I forgot: the photo on top of this post is one from a series that is batch processed with gmic!

hor.bar
pm|jun16